STEP 1 Remove grips. If you have rubber grips, heat them until they become flexible. Break the mastic by inserting a Phillips screw-driver between grip and handlebar. Then pry grip straight off. Do not attempt to twist off grip
STEP 2 Remove all residue (glue, rubber, etc..) from area covered by grip on handlebar. Clean properly using either fine sandpaper or gasoline to obtain a residue free surface, ready to receive the heating element.
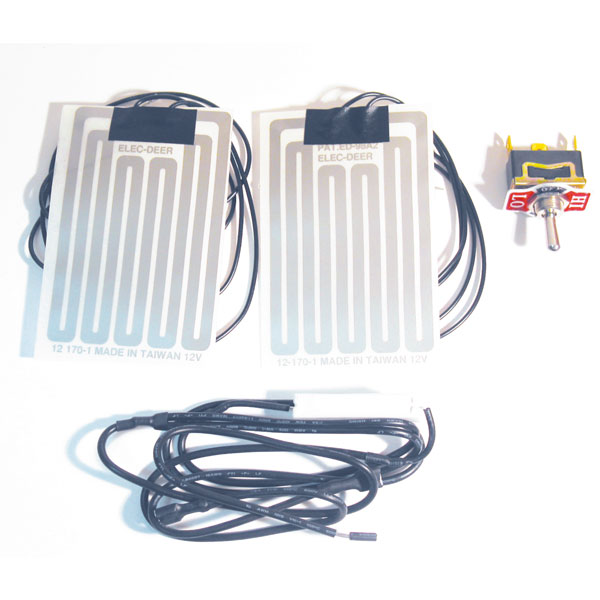
STEP 3 Remove white contact protector from heating element. Encircle cleaned area with heating element, replace rubber grip on each side Attach wires along control wire to pass underneath the hood
STEP 4 Drill a 1/2
STEP 5 Take the wire from the heating element which is not connected to the switch and attach it to a suitable ground.
a) Electric Start Models: Take a length of 18 gauge stranded wire & connect it to the end of the single wire which extends from the Y junction & connect it to the accessory lug on the rear of the snowmobile ignition switch
b) Manual Start Models: The wire mentioned in
STEP 6 Choose the switch position for the desired function: 1) Up position for high heat 2) Centre off: 3) Down position for low heat. NOTE: The lead on which the resistor is installed should be connected to the terminal which is located in front of the slot on the threaded portion of the switch in order to match the HI-OFF-LO switch.
STEP 7 Fasten wiring to steering column with electrical tape or a nylon tie wrap. NOTE: Installation instructions supplied with each kit
STEP 1 Remove grips. If you have rubber grips, heat them until they become flexible. Break the mastic by inserting a Phillips screw-driver between grip and handlebar. Then pry grip straight off. Do not attempt to twist off grip
STEP 2 Remove all residue (glue, rubber, etc..) from area covered by grip on handlebar. Clean properly using either fine sandpaper or gasoline to obtain a residue free surface, ready to receive the heating element.
STEP 3 Remove white contact protector from heating element. Encircle cleaned area with heating element, replace rubber grip on each side Attach wires along control wire to pass underneath the hood
STEP 4 Drill a 1/2
STEP 5 Take the wire from the heating element which is not connected to the switch and attach it to a suitable ground.
a) Electric Start Models: Take a length of 18 gauge stranded wire & connect it to the end of the single wire which extends from the Y junction & connect it to the accessory lug on the rear of the snowmobile ignition switch
b) Manual Start Models: The wire mentioned in
STEP 6 Choose the switch position for the desired function: 1) Up position for high heat 2) Centre off: 3) Down position for low heat. NOTE: The lead on which the resistor is installed should be connected to the terminal which is located in front of the slot on the threaded portion of the switch in order to match the HI-OFF-LO switch.
STEP 7 Fasten wiring to steering column with electrical tape or a nylon tie wrap. NOTE: Installation instructions supplied with each kit


 Canada Only